Old photo renewal, super strong elderly photo renewal
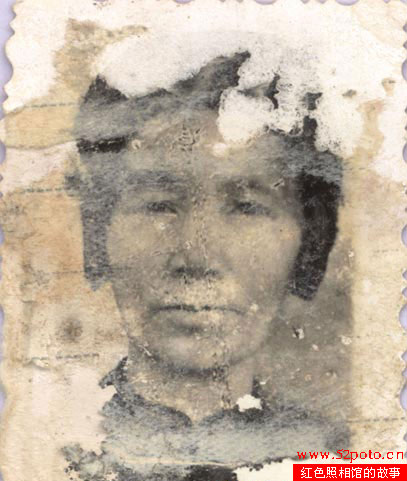
Renewing old photos - Super powerful renewal of elderly people's photos. Renewing old photos is a Photoshop task we often encounter. How can we perfectly renew old photos and be very satisfied with the results after restoration?
1. [Red100-Red Photo Studio Story www.52poto.cn] First, duplicate one or several layers of the original image (if using layer properties, then duplicate 1-2 layers and then merge). Only work on the duplicated layers.
2. After preliminary processing of the duplicated layer (adjust curves, levels, or use layer properties to brighten dark images).
3. Then copy a layer from the preliminarily organized image (to be used for cutting out the portrait), with the lower ones used as background and reference.
4. Turn off the eyes of the two lower layers, and cut out the topmost layer (usually by deletion method: selecting parts other than the portrait step by step using different methods, such as using the pen tool for curved areas [Ctrl+click path to convert to selection]; general areas use straight lasso, magnetic lasso for clearly defined edges, if it’s a solid color background use magic wand or select color range [beforehand you can duplicate a layer and adjust levels, or invert for assistance, then delete that layer], there are many methods [such as channels etc. —— not commonly used by the master]).
5. [Red100-Red Photo Studio Story www.52poto.cn] Use the stamp tool and repair tools (I rarely use them) and fingers (used to handle large nets, change shape size, pull hair) to repair and polish damaged, dirty areas of the photo. (For particularly damaged areas, you can copy symmetrical or similar areas and transplant them over [use lasso tool to select, feather "Alt+S,F", copy to layer "Ctrl+J", free transform "Ctrl+T", place in approximate position then adjust the transparency of the layer {mainly for copying precise positions like eyes, mouth, etc.}: generally 50%, then precisely adjust position, then adjust color of the layer if necessary — make it similar to surroundings, finally merge down "Ctrl+E" and use stamp tool for fine handling], carefully handle facial features with brush size adjusted larger and stamp opacity set lower [about 30%], continuously smear according to facial muscle direction [note it's dragging not clicking]) ———— For those with net patterns, Gaussian blur can be combined.