5 Ways to Record Your Linux Screen
Screen recording software under Linux, I only know Wink so far. Today, I came across this article on CB and decided to share it with everyone. Hopefully, it will be useful for you all and also help me accumulate some knowledge. (Original address)
1. Istanbul: Istanbul is one of the more widely used recording softwares currently. You can download Istanbul by clicking here. Debian LINUX and Fedora LINUX users can install this software from the repo (Fedora's main update source). Istanbul has a very simple user interface. When you launch Istanbul for the first time, a small red circular button will appear on the system desktop panel as shown in Figure 1:
Right-clicking on this button will bring up an operation menu as shown in Figure 2:
You can choose to record a window or use your mouse to select a recording area. To stop the recording, left-click on the button, and it will prompt you to save the recorded file as shown in Figures 3 and 4:
Tip: By default, Istanbul stores captured videos in OGG format.
2. Wink
Compared to other screen recording software, Wink allows you more precise control over the recording process. In fact, Wink’s recording principle differs from traditional screen recording software. It uses the number of frames per second of screenshots to achieve a video effect. For example, if you set it to capture 20 frames per second, then within one minute, it will continuously take about 1200 screenshots. These screenshots are then arranged in order to form a video. As a result, later on, you can modify any frame to change the appearance of the video. Wink usually saves recorded files in ShockWave format, which has the advantage of being convertible into any video format you desire.
Click here to download Wink.
Please note that Wink does not work under the following conditions:
- Ubuntu versions above 8.04;
- Other LINUX distributions where the file "libexpat.so.1" exists in the "/usr/lib/" directory. The solution for this situation is to rename the "libexpat.so.0" file, and doing so will not cause system issues. Of course, the downside of this approach is that it may prevent other applications requiring this file from functioning properly. A more permanent solution would be to recompile the affected applications or wait for updates of the program.
To start recording, begin with the "New" option from the "File" menu. In the dialog box that pops up, choose the size of the recording as shown in Figure 5:
You might notice that, by default, Wink captures 50 frames per second as shown in Figure 6:
When you click "OK," a window will pop up showing the shortcuts available during the recording process as shown in Figure 7:
Click "MinimizeToTray" in the figure above to minimize the program to the system tray, similar to running in the background in Windows. Right-click on the icon in the system tray and select "StartTimedCapture" to begin screen recording as shown in Figure 8:
To stop recording, simply choose "StopTimedCapture" from the pop-up menu (this option appears grayed out in Figure 8), after which a recording report will be generated, informing you of the number of frames currently captured as shown in Figure 9:
In order to obtain a true video file, you need to convert the captured image frames. Specific operations are shown in Figure 10 (click the small green arrow):
After conversion, enter the save file dialog box. Here, you can customize the filename, file type, and frame rate as shown in Figure 11:
3. Xvidcap
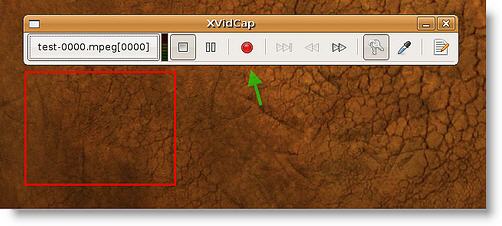
Xvidcap is a lightweight screen recording software. You can download the software by clicking here. After launching Xvidcap, a red rectangular frame will appear on the screen, and the area within the frame is what will be captured. Of course, you can freely drag the frame to adjust its position and size. Starting the recording is simple; just click the small red button in the figure as shown in Figure 12:
Note: If the selected screen area is large, it may slow down the system.
4. vnc2swf
Another popular but less convenient screen recording software is called vnc2swf. Its working principle involves connecting to a VNC server and capturing sessions to obtain recordings. Debian LINUX users can install this software using the command "sudo apt-get install pyvnc2swf." Other users can download it from the following website: http://www.unixuser.org/~euske/vnc2swf/
After installing the software, starting the recording process simply requires entering "vnc2swf -o test.swf -N -S localhost:0" in the "Terminal." A recording dialog box will appear as shown in Figure 13:
For more related operations, please refer to the official documentation.
5. Recordmydesktop
The last one I want to introduce: Recordmydesktop is also a widely used screen recording software that runs via the command line and has a graphical user interface. Debian LINUX users can install this software using the command "sudo apt-get install recordmydesktop gtk-recordmydesktop." Other users can download it from the following website: http://sourceforge.net/projects/recordmydesktop
Recordmydesktop works similarly to Istanbul but has some features that Istanbul does not have, and these features are self-explanatory. General users can easily understand and configure them accordingly, so I won't go into further detail. Its user interface is shown in Figure 14:
