Flash Mask Special Effects Example -- Magnifying Glass (with Figure)
We are no strangers to magnifying glasses, as they are often used in daily life. In fact, the magnifying glass effect can also be well simulated using Flash. This example will explain how to simulate the magnifying glass effect, with the final result shown in Figure 1:
http://www.chinaitpower.com/TechImages/030114news032.jpg
The magnifying glass effect is simple to create. The key lies in the concept and techniques behind its creation. During the process, a small amount of scripting is used, such as defining variables and dynamically controlling instance positions with some statements like `setProperty()`. The specific steps for creating it are as follows:
1. Create a new movie, set the film size to 585px x 483px (in pixels), and set the background color to white. Of course, in this example, the setting of the background color has no impact on the overall film effect and can be set arbitrarily. Import a pre-prepared image into the library.
2. Create a new movie clip named "picmovie", insert a keyframe in the first frame, open the library panel, drag the imported image into the workspace, and use the Free Transform tool to resize the image to an appropriate size (798px x 598px).
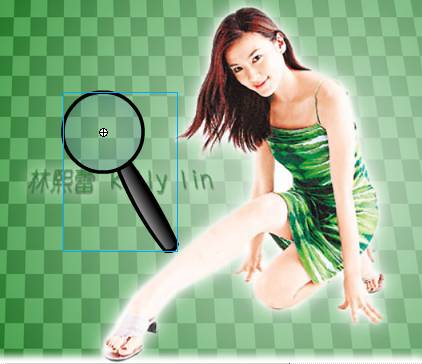
3. Create a new movie clip named "meng". Select the first frame of the default layer and insert a keyframe. Drag the movie clip "picmovie" into the workspace and create an instance. Insert a mask layer, select the first frame, and draw a solid circle in the workspace with a fill color of #0066CC and a black outline, as shown in Figure 2:
http://www.chinaitpower.com/TechImages/030114news033.jpg
...